Fireworks in Tallinn

A new beginning for a new year

Happy new year to everyone! For me, the new year came with a new address. Hop over to http://angryhungryhobbit.com/ and subscribe there, if you’re still on the old blog! All posts and comments are transferred to the new site by now. Unfortunately I can’t do that automatically since the link for doing it doesn’t exist for me. Weird and slightly annoying. I spent last night researching everything I could find, unfortunately to no result. So I contacted WordPress to get some help and hopefully they’ll be able to do it for me. Now if I could find a way to transfer all stats and likes as well, that would be great.

Fellow food bloggers, do you have any WordPress plugins that you think are must-have for a self-hosted site, do let me know! I’m especially interested in recipe plugins, since there’s so many out there and I want to pick the best one. What’s best for me? Fast to use (no need to type everything in separate boxes etc), makes searching easier for search engines and looks good on the site. If you think you know a suitable one, drop me a comment! I’d be very grateful :)

So, all the best for 2015 and it’s great to see you on the new site (which looks quite like the old one for now)!

Filled bell peppers

Filled bell peppers

Sometimes you want an awesome-tasting and colourful meal without doing too much work for it. Filled bell peppers are perfect for that! They look great, taste even better and don’t take overly long to make. Sure, there’s the longish baking time, but you can do something else while your dinner hangs out in the oven and gets ready to eat. My photos of this meal are unfortunately a bit rushed and even blurry, since we were in a hurry with eating and I couldn’t spend long on taking photos this time.

Staying at my boyfriend’s parents for a while posed some challenges food-wise. I couldn’t eat a lot of the everyday meals they normally had, so often I ended up having a separate meal or changing some sides for myself so I wouldn’t have meat with potatoes for example (a sure recipe to give me a heavy and expanded belly plus some pain). Fortunately my testing with meat&rice gave no bad results, so I was very happy to eat this combination. And there was no need for separate meals since everyone could eat this! Win!

Filled bell peppers (for 4)

4 red bell peppers
400 g minced meat
4 garlic cloves
2 carrots
1 onion
1 tbsp olive oil
1 tsp dried parsley
1 tsp dried rosemary
0.5 tsp nutmeg
salt and pepper to taste

Filled bell peppers

Chop up the onion, garlic cloves and carrots in tiny pieces. If you have access to a food processor or are less lazy than me with normal rasps, rasp the carrots instead to get a better texture for the filling.

Filled bell peppers

Cut the bell peppers in half and place them on a baking pan covered with baking paper. I prefer stopping the cut before the stem on both sides and then cracking the pepper open. This way nothing of the lovely flesh gets lost and it’s easy to gently remove the seeds and white strips without getting the entire bell pepper full of seeds.

Filled bell peppers

Mix all ingredients together. You may need to use your hands to do it properly. Another option is doing it in the food processor. If you chopped the carrots instead of rasping, this step can be kind of tricky. The damn cubes insist on staying separately.

Filled bell peppers

Distribute the filling between the bell pepper halves. Tuck it nicely under the nooks as well to fill everything properly. This is where you’ll be happy to have used my method of halving the peppers instead of brutally chopping the stem out. Since you have more bell pepper left, the filling is less likely to start wobbling out the stem hole during cooking.

Filled bell peppers

Bake at 180°C (356°F) for about 40-45 minutes. The filling will still be juicy and the bell peppers are starting to turn a bit black. If some parts end up slightly burned, don’t worry. Just peel that part off while eating, the bell pepper flesh will be all the more delicious! The ones on this photo were taken out at 35 minutes already since we were in a slight hurry with eating. They were still a tiny bit too crunchy at that time.

Filled bell peppers

Serve with rice and a salad. I made my salad with iceberg lettuce, carrots, white radish, apple and cherry tomatoes. To keep the bell peppers warm, I first served everyone one half and kept the rest in the turned off oven until the first halves were eaten.

Raw Banana Pudding Cupcakes

Raw Banana Pudding Cupcakes

Do you like raw cupcakes, but want a change from the normal texture of avocado or coconut cream frosting? These lovely cupcakes have a puddingy layer of frosting and the flavours are all mild and natural. The only added sweetener is a tiny teaspoon of agave syrup and that’s mainly for sticking the base together.

This cooking episode is not from my own kitchen – this year’s christmas and new year are spent in the Netherlands and my recent cookings have thus been in a different kitchen. I can now navigate the kitchen of my boyfriend’s parents almost as well as my own tiny kitchen at home! This recipe was made up right there on the spot since I wanted to make something new and exciting with my awesome guest. She also has some food issues, so we wanted to make something that both of us could eat. The result was very nice and I’m glad this all worked out – I had never used arrowroot powder for puddingy stuff before and I had no idea before starting whether it would even stay as frosting or not. But hey, it worked! Great success.

Raw banana pudding cupcakes

Cupcake base:
75 g almonds
30 g dates
30 g figs
1 tsp agave syrup

Raw Banana Pudding Cupcakes

Normally I would just chuck all ingredients in my blender and blend them together until they form a slightly sticky mass. You can do exactly that if you wish. Since I wasn’t at home and able to use my trusted food processor, I had to improvise. First, I used a small chopper for chopping up the almonds until they formed small chunks.

Raw Banana Pudding Cupcakes

Then, to make things easier for the tiny machine, the figs and dates got chopped smaller the old-fashioned way. This also ensured that they will definitely not end up in big chunks even after using the mini-processor.

Raw Banana Pudding Cupcakes

Process the figs and dates in the food processor for a short bit with the teaspoon of agave syrup. I only added a little bit of the almond mixture in the machine since there wasn’t enough room for everything. Then I transferred all chopped things to a bowl to continue the mixing by hand. This is where the mixture should get nice and slightly sticky. Add a teaspoon of water if needed.

Raw Banana Pudding Cupcakes

Distribute the mixture between four cupcake forms and push it down with the back of a spoon. You can also use your fingers, but the “dough” will definitely stick to them. The base is now done! Put the filled forms in the fridge or freezer for while you make the frosting part. You have probably noticed how thin the base is in the picture. If you want them to be thicker, you can of course make more of the mixture. I quite liked them this way, you’ll get a nice balance between the base and the frosting.

Banana pudding frosting:
2-3 bananas
2 tbsp coconut oil
1 tbsp arrowroot powder
1 tsp lemon juice

Raw Banana Pudding Cupcakes

If your bananas are on the small side, you may need to use three. With normal or big bananas, two is enough (unless you want to eat som separate pudding later, which is also cool). Put all ingredients in a bowl or something and blast them into a puree with a hand blender. You’ll notice that this is all rather liquid and there’s no way this would stay nice on your cupcakes. Fear not, for this is only the first step!

Raw Banana Pudding Cupcakes

Transfer the mixture to a small pot. As you see, it’s rather thin and doesn’t stay in any shape other than flat in the pot or smeared on the sides of the pot. This is where the magic of arrowroot comes in. Put the pot on the stove with low heat. Don’t leave it there alone though, keep mixing it with a whisk.

Raw Banana Pudding Cupcakes

In around five minutes or less, the mixture gets a LOT thicker. As you can see from this photo, there’s no thin stream anymore. The mixture attempts to fall down in thick clumps of goop. That’s excellent! It’s still not firm enough to be piped on the cupcake base, but there’s an easy solution for that. Let it cool down for a while, until it’s around room temperature or so.

Raw Banana Pudding Cupcakes

Now you can fill a piping bag with the pudding frosting and pipe it onto the cupcakes. Decorate with stuff of your own choice. These lovely cupcakes got four different kinds of decorations, so they all had their own look. The taste is very mild, all flavours get mixed together into one lovely combination and nothing overpowers the other tastes. It’s not very sweet either, most of the sweetness comes from the natural sugars in the fruits.

Raw Banana Pudding Cupcakes

Serve with a tiny fork and enjoy!

VVLPButton1-300pxI submitted this recipe to the Virtual Vegan Potluck to share it with more people and find some new recipes myself as well!

Lemon-Chestnut Biscuits

Soft lemon-chestnut biscuits

A holiday table can be tricky for those who have food issues. So many delicious things on the table, but still nothing to eat! To fix that, I decided to come up with things I could eat so there would be at least one sweet snack available to me at all times. Since I had been making rather sweet-tasting things for a while, I wanted a change. So I came up with a recipe for slightly sour and bitter lemon biscuits, made with chestnut flour and olive oil and a bit of thyme.

These biscuits have a rather special taste, the combination of olive oil with thyme and chestnuts makes me think of Italy. Don’t make them if you only like ordinary sugary sweets, this is definitely a step outside the comfort zone in that case. But if you’re also craving something different and super-lemony, do give them a go and let me know how it worked for you! I am quite pleased with the result and would definitely make them again.

Lemon-chestnut biscuits

250 ml chestnut flour
3 tbsp agave syrup
2 tbsp olive oil
1 flax egg
half a lemon (both juice and zest)
2 tsp arrowroot powder
1 tsp dried thyme
a bit of sea salt
dark sugar of choice for decorating (like muscovado or coconut sugar)

Lemon-Chestnut Biscuits

Make a flax egg by grinding a tablespoon of flax seeds and mixing it with three tablespoons of cold water. Put it in the fridge so it can obtain an egg-like consistency. While waiting for that, mix all the dry ingredients in a bowl and rasp your half a lemon. Chop the zest tiny and add it to the bowl. To be on the safe side, you may want to preserve some of the zest for later – first finish the dough and see whether it’s already lemony enough for you. If not, add some more zest.

Lemon-Chestnut Biscuits

Start preheating the oven to 200°C (392°F). Once the flax egg has been in the fridge around 15 minutes, add it to the bowl with the olive oil and agave syrup. Squeeze the juice from the half-lemon you rasped before and add that as well. Mix everything properly. I recommend getting in there with your hands, they’re the best tools for making dough.

Lemon-Chestnut Biscuits

Once you’ve formed a nice ball of dough, divide it in two. Roll both into longish worms between your palms, flatten them and press in ridges with a big fork. These ridges will help sugar to stay on the biscuits. Since the dough is rather sour and even a bit bitter from the lemon zest, it’s nice to add a bit of sugar on top for both taste and looks.

Lemon-Chestnut Biscuits

Line an oven pan with a baking sheet and place both flat dough worms there. Sprinkle some sugar on top and press it down with the back of a spoon so it stays in place. Bake in the oven for 10 minutes. It won’t be hard or overly dry when done, but it may have some darker brown areas. These biscuits will stay soft, so this is all good.

Lemon-Chestnut Biscuits

Once the pan is out of the oven, let it rest for a while. You need the biscuits to cool down a bit so you can handle them without burning yourself. When you can touch them without problems, lift them to a cutting board and slice into diagonal strips.

Lemon-Chestnut Biscuits

They make a nice addition to a festive table or just a lovely snack for when you want a slightly different biscuit. Enjoy!

Vegan gluten free gingerbread

Vegan gluten-free gingerbread

As christmas was approaching, I started looking for a gingerbread recipe that would only have the ingredients I can eat and wouldn’t be too difficult. Only after looking at a few dozen impossible recipes and giving up on this dream, I managed to accidentally create a wonderful vegan gluten-free gingerbread recipe! The aim was to just make something with the chestnut flour that was waiting in the kitchen. After adding some spices, the dough suddenly tasted like proper gingerbread! The spice flavours combined with the slightly sweet chestnut flour create something wonderful, no syrup or molasses needed for making gingerbread. All excited, I tried to stop bouncing around for long enough to stamp the biscuits and bake them. The result was one pan of lovely soft gingerbreads with no wheat flour, no eggs, no cane sugar and no dairy. What a dream!

This discovery really helped to create a proper christmas mood – making gingerbread was always a part of my family’s christmas traditions. We made a ton of biscuits and finished eating them somewhere in January. These vegan gingerbreads won’t probably last for that long, but only for the reason that I’ll eat everything. Hey, I need something to snack on while others are stuffing their faces with wheat and sugar over christmas!

Vegan gluten-free gingerbread

200 ml chestnut flour
3 tbsp coconut sugar
2 tbsp coconut oil
1.5 flax eggs
2 tsp arrowroot powder
1 tsp cinnamon
0.25 tsp ginger powder
0.25 tsp nutmeg
0.25 tsp clove powder
a pinch of sea salt

Vegan gluten free gingerbread

First make the flax egg – for this recipe you need 1.5 “eggs”, so grind 1.5 tbsp flax seeds into powder and mix with 4.5 tbsp cold water. Put that in the fridge for 10-15 minutes. Mix the dry ingredients well, then add coconut oil and flax eggs. If you use pre-ground flax seeds, they might not form a very egg-like texture even after leaving them in the fridge with water for a while. I fixed that by putting the mixture in the blender for a short bit – it nearly foamed up!

Vegan gluten free gingerbread

Using your hands, form a nice dough ball. It will take a bit of time for the coconut oil clumps to warm up in your hands and blend into the dough. Do not give up though and don’t add anything to the bowl, it will eventually form a firm ball of dough.

Vegan gluten free gingerbread

Preheat the oven to 180°C (356°F) and line an oven pan with baking paper. Gently roll out the dough and stamp biscuits. I didn’t need any flour for that, the dough didn’t really stick that much. Don’t make the biscuits too thin, the thickness in the photo produces nice soft gingerbreads.

Vegan gluten free gingerbread

If you don’t want to deal with stamping, you can also form small balls from the dough and flatten them a bit. I tried sticking almonds on them, but since the dough isn’t sticky, they didn’t really get attached do the biscuits. They were nice and roasted nevertheless. You can place the gingerbreads quite close to each other on the pan since they don’t expand at all. They stay in the shape they were before baking.

Vegan gluten free gingerbread

Put them in the oven for 10 (for the stamped ones) to 12 minutes (for the almond balls). As you see, the shapes are the same after baking. So you can make exactly the shapes you wish and not face the disappointment of your biscuits having formed a uniform blob on the pan.

Vegan gluten free gingerbread

Put them on the table and watch them disappear!

Gluten Free One-Apple Pie

Vegan gluten-free one-apple pie

Adapting to my new diet due to health reasons, I was afraid I’d never have a gluten-free, sugar-free, dairy-free and egg-free apple pie that would taste as great as the ones I used to make before food troubles. I had found some awesome raw cakes for myself, but the boyfriend didn’t really agree with eating stuff that hadn’t been baked. So I set myself a goal: make a great-tasting apple pie that adheres to my stupid food rules, is delicious to eat and makes my boyfriend reach for a second slice.

Since I hate throwing even failed food away, I really needed a smaller cakeform for conducting my pie experiments. So I bought a tiny springform (12 cm diametre) and three apples and started testing. It only took three tries to come up with a recipe that tasted similar to my old apple pies and fulfilled all the requirements. This adorable little pie takes only one apple and feeds two-three people for dessert. If you want a bigger pie, you’ll have to multiply the ingredients by three or so.

Gluten free one-apple pie

CRUST
50 ml rice flour
1 tbsp oat flour
1 (flax) egg
1 tbsp coconut oil
3 tsp coconut sugar
0.5 tsp arrowroot powder
0.25 tsp cinnamon
0.25 tsp nutmeg

Gluten Free One-Apple Pie

If you can’t eat eggs, there’s this amazingly easy way of replacing them for a lot of foods with flax seeds. You can of course use an actual egg if you wish – in that case skip the flax egg steps. For the replacement, take one tablespoon of flax seeds and put them in a grinder. I’ve also made mine in a blender, but now I have an actual grinder for it. Yet again – thank you, parents! It also doubles as a coffee grinder for my boyfriend since he is lucky enough to be able to drink that.Gluten Free One-Apple Pie

Grind the flax seeds into a fine powder. Then put it in a bowl and add three tablespoons of cold water. Whisk it together with a fork and place the mixture in the fridge. Now you can start gathering all other ingredients and pile them on the table. During that time, the ground seeds will turn into a weird goopy mixture that binds foods together like egg whites do.

Gluten Free One-Apple Pie

Take all the dry ingredients and sift them together. The arrowroot powder is there to make the non-wheat flours a bit fluffier and give the pie a nice texture. The tablespoon of oat flour is also there for a more interesting texture, but it has the bonus of adding some nice oaty flavour. (The photo has a chickpea flour package in the background since I used that on my first try, but I vastly prefer the oaty addition from my next versions of this recipe.) I guess using only rice flour could work as well, but oat or even buckwheat flour adds this little extra oomph that gluten free foods often need.

Now add coconut oil and the (flax) egg. Mix well. The dough should have a quite nice consistency now – not too dry and not too runny. Of course it will be a bit sticky, but that’s to be expected from a recipe like this.

Gluten Free One-Apple Pie

Grease your 12 cm springform (or line the bottom with baking paper) and use your fingers to spread the dough nicely. I like making quite high edges so there’s something to keep the apples and the crumble in place later. No need to use a rolling pin or anything, just pinch a bit of dough and spread it, adding next pieces next to it and connecting them. The dough is sticky enough for playing around with it.

FILLING
1 apple
some cinnamon and lemon juice

Gluten Free One-Apple Pie

Dice the apple into small cubes. Peel it first if the peel is weird and waxy. Fill the springform halfway, then sprinkle some lemon juice and cinnamon on top. The lemon juice adds some nice sour notes to the pie, this is especially important with more ripe apples. Apples for a pie should always be slightly on the “green” side. If they’re too ripe, they’ll just form a sweet mush – which is great if that’s what you’re aiming for. But if you want your apple cubes to stay as cubes and have a nice fresh flavour even when baked, go for less ripe ones. Even rather raw apples can be used successfully for pies!

Gluten Free One-Apple Pie

Now fill the form properly. One apple should be exactly enough for it, or in case of a bigger apple, you’ll even have a bit extra to munch on. This is why I really love this recipe – it literally only takes one apple and not much of the other ingredients either, so you can make a fresh mini-pie every day if you wish.

CRUMBLE
50 ml almond meal
1 tsp coconut sugar
1 tsp coconut oil
0.5 tsp cinnamon

Gluten Free One-Apple Pie

Combine all ingredients in a bowl, mixing properly. Here you can use leftover almond meal from making almond milk, chop up some fresh almonds or even use some other nuts. Walnuts are lovely for apple pies, but I use almonds because these are the safest option for me. (I’m still testing other nuts to see whether they make me feel ill after eating.)

Gluten Free One-Apple Pie

Cover the pie with the crumble. Put it in the oven (200°C / 392°F) for 35. I recommend using the lower part of the oven so the top doesn’t burn and the crust gets nicely cooked. Depending on your oven, the cake can be ready sooner or later than the recommended time. Definitely check the cake every now and then to make sure you won’t end up with a burned crumble or dry pie.

Gluten Free One-Apple Pie

Let the pie cool down a bit before cutting it open – otherwise the filling might run away before you can lift the piece. This tiny pie was perfect as a sweet lunch for two people. I had half and then tried to attack my boyfriend’s half with a fork to get some extra. I did not succeed. I probably could eat this entire pie alone as well. Tiny and delicious!

Cashew Coconut Butter

Cashew and coconut butter

I don’t really like the insanity around christmas – the idea that you have to buy a ton of presents just because “you have to” seems a bit silly. So I ignored all normal presents this year and decided to only give out selfmade things that I’ve made because I want to. No queueing for trinkets and asking people for lists! No worrying because I can’t find this one really specific thing that someone wants! Only good food and love from me this time. Maybe I’ll join the madness again next year, but with this year’s illnesses and recovering from surgery, it just didn’t seem like a wise choice.

So instead I pretty much lived in the kitchen for a few weeks. I was feeling too ill and weak to go out much anyway, so I decided to do something I loved to cheer up. The kitchen was a flurry of nuts, chocolate, fancy sweeteners and jars, the camera was lying in a pool of rice flour somewhere and I had a ton pens and tiny papers around to mark down all ingredients for all recipes I was making. When something turned out well, I made a note to share it on the blog as well. Since this nut butter turned out very nice, it’s definitely for sharing! It has a delightfully light nutty taste with a hint of coconut and vanilla. It’s best eaten with something mild-tasting so the nut butter’s flavours don’t get hidden underneath.

Cashew and coconut butter

160 g / 250 ml cashews
35 g / 100 ml coconut shreds
2 tsp agave syrup
0.5 tsp vanilla powder

Cashew Coconut Butter

Put the cashews and the coconut shreds in a food processor. I used a blender, since I have a rather powerful one. Don’t soak the nuts and don’t add anything else besides the nuts and shreds. If you wish, you can roast the cashews before making the nut butter, but I found them to be a lot easier to handle than almonds, so the roasting wasn’t really necessary.

Cashew Coconut Butter

Turn the blender on. Very soon you’ll have this lovely yellowish powder. This is the first step of making a nut butter, everything is blended into a flour. You have to keep going for a while to bring out the oils and turn the dry powder into a wonderful creamy butter.

Cashew Coconut Butter

Keep on blending. The moment you see the mixture has climbed up the walls and the blades are chopping air, turn the blender off and use a spoon or a spatula to push everything down again. If you just let the machine run and chop thin air, it won’t do anything. So don’t waste your time and electricity, sit next to the machine and keep stopping to push stuff down.

Cashew Coconut Butter

As you keep on going, you’ll get moist crumbs that try to form clots. Crush them mercilessly. Also, in addition to pushing the crumb walls down, you’ll now need to scoop the bottom parts up and mix them with the rest. Otherwise you’ll have cream on the bottom and crumbs on the top part.

Cashew Coconut Butter

Neeearly there! At this point you’ll start seeing the mixture balling up. This huge clot is rotating around and needs less pushing down than before.

Cashew Coconut Butter

Aaaaaand butter! It could still be processed for a bit longer for a creamier mixture, but it’s perfect for our purpose since we still need to add two things.

Cashew Coconut Butter

Now add the vanilla powder and agave syrup. As you see, I’m not using vanilla sugar. This is pure powdered vanilla bean. It’s more expensive than vanilla sugar, but it’s really worth the price. Instead of some factory-made “vanilla-flavoured thing”, this is the real stuff. Looks a lot more luxurious as well after blending everything together! If you have vanilla extract, you can of course use that instead if you wish. Anyway, blend this all in and you’re done!

Cashew Coconut Butter

Scoop the nut butter into a jar of your liking. I was unfortunately out of small jars and had to use a plastic case instead. Doesn’t look as pretty, but still does the job. Keep it at room temperature if you plan to eat it in a few weeks. For longer keeping I recommend the fridge instead. Enjoy!

Tomato Soup

Warming and rich-tasting tomato soup

There are some meals that I’d rather let my boyfriend handle. Tomato soup is one of them, because he makes a really mean one – and now you can make it too! I sat in the kitchen with him, assisting, chopping and photographing while taking notes on everything so I could share his awesome soup with you (and so I could make it myself later as well). The recipe has optional meatballs. I looooove them, but they can of course be skipped for a vegan version.

When buying the ingredients, look out for soft tomatoes! In a good way though, soft ones are great for this. As long as they’re not actually rotten and seeping weird stuff, of course. Sliiightly over-ripe ones are perfect though. So go to a shop to rescue those poor tomatoes that might get thrown away that night and make them into soup instead! This recipe makes a rather huge amount (I’d say at least six portions, perhaps more), but don’t worry. It freezes very well, so just put all leftovers in the freezer in nice portions and you have dinner for those lazy days where you just can’t be arsed to cook.

Tomato soup

1 kg tomatoes
3 average carrots
3 celery sticks
2 small onions
3 garlic cloves
10 black peppercorns
1 tbsp parsley
1 tsp of each thyme, oregano and basil
1 beef bouillon cube (or replace with a veggie version)
salt

Tomato Soup

The recipe is rather easy, most things don’t even need to be chopped small. All garlic cloves and one onion need to be chopped tiny, do that and put them aside in a bowl. Now take the remaining onion, chop it roughly and put it in the pot (pick a big pot!). Peel the carrots, chop these and the celery sticks in 5-6 pieces each. Tomatoes can be chopped in eight pieces or so, no need for tiny dicing. All chopped stuff joins the second onion in the pot. Since this stuff is going to be pureed anyway, you can skip most of the chopping work that is needed for normal soups.

Tomato Soup

Add herbs and the bouillon cube. Don’t add the salt yet, leave that for later. If you’re vegetarian/vegan or just don’t like beef bouillon, you can either use a veggie version or add some lovage herb. I’ve never used it myself, but apparently it gives a nice rich taste even without any (beef) cubes. All herbs used here are dried, except for parsley – I happen to have three boxes of chopped and frozen parsley in my freezer for soups and other foodthings. If you happen to have fresh basil, don’t add that yet. Wait until the boiling is done and then add chopped leaves.

Pour enough water in the pot to nearly cover everything – you want plenty of liquids for this amount of veggies. Put the pot on the stove on high heat. Once the soup is boiling, you can lower the heat and let it boil away for 45 minutes. Now, if you happen to be a fan of meat, you’ll be spending most of that time making meatballs.

Meatballs

400 g ground beef
1 tbsp salt
0.5 tsp nutmeg
white pepper to taste

Tomato Soup

Plop all the minced meat in a bowl, add salt and nutmeg. With pepper do as you wish – if you like spicier stuff, go wild with it. If you’re meh about spices, you can only add a little bit. I do recommend adding some for the enhanced taste though. Mix the ingredients thoroughly so you don’t have a little ball of nutmeg later. (It was tasty, but it would also have been nice to have it a bit more distributed…)

Tomato Soup

Now dig in and make teeny-tiny little meatballs (approx. 2cm in diameter) in the palm of your hand. They’re adorable, but they do take time. But what else would you be doing while waiting for the boiling to be done anyway? Roll them quite tight so they won’t come apart in the soup. Also, they stay juicier inside like that. Don’t worry about cooking through – that’s why we’re leaving the balls small!

Tomato Soup

Now wash your hands and deal with the onion and garlic you put aside earlier. Fry them in olive oil until they turn golden and almost brown. This will give an awesome rich taste to the soup. I’m assuming that by now, the soup will have boiled for around 45 minutes. Take it off the stove, grab a handblender and blend the entire pot properly. This may take some time, you have a lot of veggies in there. Once you’re done, add the meatballs and fried stuff. Return the pot to the stove and boil on low heat for about five minutes so the meatballs get nicely cooked. Now, before adding any salt, taste the soup first! The meatballs were made rather salty and they do give some of their salt away to the soup. So taste first and then decide if and how much you need to add. We added one teaspoon and that was enough.

Tomato Soup

Scoop some soup in a bowl and enjoy! Try to leave some meatballs for next time as well – there’s so much soup that your next meal is sorted! We had it for two meals and then froze the rest for later.

Honey and dill mustard

Homemade honey and dill mustard

“We don’t have to make everything ourselves,” was his response when I excitedly said that I’m going to make some mustard to replace our nearly empty store-bought jar. I may have taken it as a challenge, trying to come up with even more things that don’t have to be bought ready made. I already make my own nut butters and crisps, going to try mustard now… what else could I make at home? (This is the part where you give me suggestions and I try to actually make them! Sharing the recipes here, of course.)

I was doubly excited to do this since I had been clearing out some stuff at my old room at parents place, finding some delightful items for using as photo backgrounds. Some handmade table-cloths, some nice crochet attempts, some old colourful silk scarves that were too broken for wearing… I wanted to pair some white patterns with this delightfully yellow mustard. It’s even more yellow than normally, since I decided to add some turmeric for health benefits and colour. It probably looks a bit unnatural on photos, but I can swear to you that it actually is abnormally bright yellow.

Honey and dill mustard

100 g yellow mustard seeds
100 ml dry white wine
3 tbsp honey
1 tsp dried dill
0.5 tsp turmeric
some salt and black pepper

Honey and dill mustard

Soak the mustard seeds in cold water for 12-24 hours. Don’t use an aluminium bowl as that can react with mustard. I used a ceramic bowl and covered it with a plate. Why cover? Well, the seeds can acquire an interesting smell during soaking. Mine smelled like fried egg after 24h. But that’s okay, I just rinsed them properly under cold water once done.

Honey and dill mustard

Separate one heaped tablespoon of soaked seeds, put them aside. Blend all other ingredients together with a handblender until it looks rather smooth. It will look an almost scary shade of yellow due to the added turmeric. I like it, but you can of course skip turmeric if you’re not a fan. Once everything is blended, add the previously separated seeds and stir well. If you want a completely smooth mustard, just blend all the seeds from the beginning. Having some whole seeds in makes the texture more interesting in my opinion, so I like adding them in the end.

Honey and dill mustard

If you like very strong mustard, it’s done! Don’t be scared if you do not like the taste at all at this point – mustard will mellow over time if left on a counter. Put the mixture in jars, but instead of storing them in the fridge, leave the shut jars at room temperature until the desired taste is achieved. It will slowly mellow in the fridge as well, but the cold makes the process very slow. How long should you leave it out? Depends on your preferences! It can be anything from a day to weeks or even months. Just keep tasting it until you like it.

So what I’m trying to say is “don’t give up on your mustard!” just because it doesn’t make you ooh and aah immediately. It’s completely normal, just put it aside and let it mature a bit. Also, don’t be afraid to experiment! Take the base mixture (seeds and something sour, be it dry wine or vinegar or sour apple juice…), mix that and then make small separate batches with different flavourings. Start eating them or give them out as presents once the taste has mellowed enough and you’ll have a happy mustard time.

Hazelnut-chocolate nut butter

Healthy mock-Nutella: homemade three-ingredient hazelnut butter

My niece and nephew love Nutella, as do most kids. Unfortunately it’s not the healthiest thing ever, so I decided to surprise them with a safe and mum-approved homemade Nutella after discussing it with my sister. Nutella is mainly known as a delicious hazelnut butter. So the main ingredient is hazelnuts, right? …no. The main ingredient is sugar. Then comes vegetable fat. And only then hazelnuts at 13% of all ingredients. Actually, more than half of the jar is sugar! No-no-no, that won’t do. So I armed myself with a bag of hazelnuts and some cacao powder to make a chocolate spread that gives your body some actual nutrients in addition to the awesome taste.

Unfortunately I can’t enjoy the chocolate spread myself – hazelnuts are not allowed for me. I thought it was bullshit, I’ve always eaten hazelnuts and enjoyed them. Well, my body thinks otherwise. Looks like having my gallbladder removed reversed quite a few things about how I can handle different foods. The moment I started smelling roasting hazelnuts, I had to open the kitchen window since I felt incredibly sick. The window had to remain open for the entire time I was in the kitchen, despite the chilly winter temperatures outside. Still thinking this has to be some stupid mental thing, I ate a few nuts once they were out of the oven. Nooooooo. No-no-no-no. Nope. No hazelnuts for me anymore, thankyouverymuch. At least until my recovery process is over, I’ll steer clear of these evil little crunchy things.

The chocolate spread worked really well though, so I’m hoping that people who can eat hazelnuts will give this a go. No sugar and vegetable fat in this one, it actually has only three ingredients! So, go and find an empty jar and start with the recipe!

Hazelnut-chocolate nut butter

150 g hazelnuts
1.5 tbsp cacao powder
1 tbsp agave syrup (or some other liquid sweetener)

Hazelnut-chocolate nut butter

If you’re a raw foodist, skip the next few steps about roasting. If you’re not, I highly recommend doing it since roasted nuts have awesome flavour and they also turn into butter more easily. Put your hazelnuts on an oven pan covered with baking paper. I’ve used the same sheet of paper for making four different batches of nut butter so far – just roll it and keep it in your cupboard for when you need to use it again.

Hazelnut-chocolate nut butter

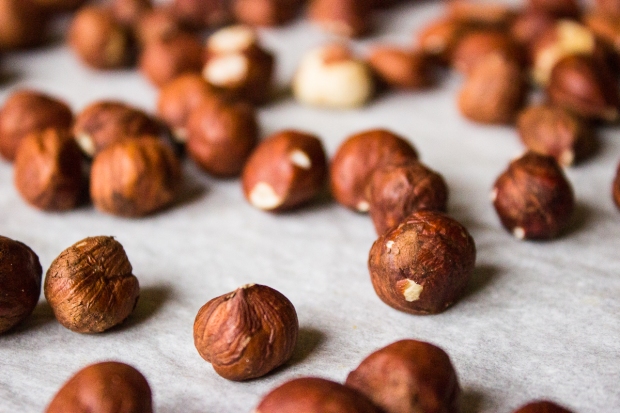
Roast the nuts at 130°C (266°F) for 15 minutes in the top part of the oven. After roasting, you’ll see that the nasty brown skins are ready to crumble off. Excellent! Grab a clean kitchen towel and transfer the nuts to the unfolded towel with a spoon or something so you don’t burn yourself.

Hazelnut-chocolate nut butter

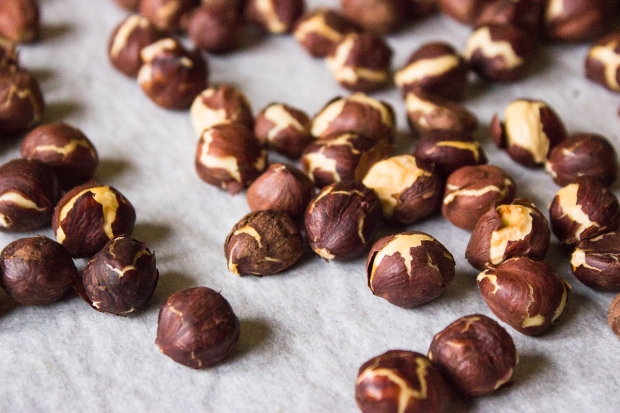
Wrap hazelnuts in the towel and rub them against each other and the table. The friction will make most of the brown skins come off and the towel will protect you from the heat. Win-win! Let the nuts chill for a few minutes so they’re not burning hot anymore. If you put your ear near the towel, you’ll hear the nuts crackling from the heat. Makes me think of winters at a fireplace. Anyway, after a few minutes you can carefully scoop the hazelnuts off the towel and then just flap the towel out the window to get rid of the nut skins. I bet some birds would be happy to find them.

Hazelnut-chocolate nut butter

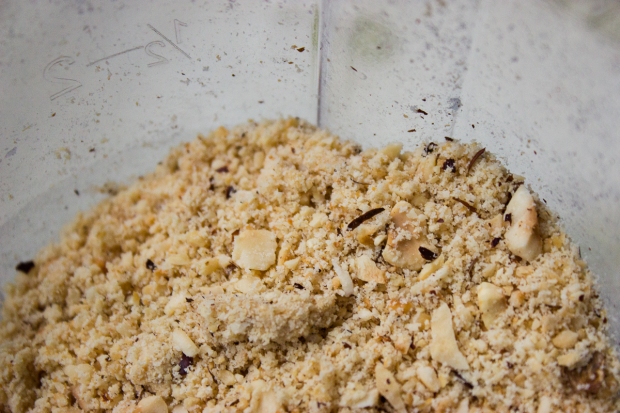
Now, this is where raw foodists can continue reading. Place the nuts in a food processor – it has to be kind of powerful to handle making nut butters. Mine is a 400W Bosch processor, so it’s handling things quite well. Best birthday present ever, seriously. (Thanks, parents!) Anyway, turn the processor on and chop the nuts at high speed. You’ll notice that the crumbs have a delightful golden colour, if you did the roasting part. Also it’s all quite light since there’s barely any skins left to turn it dark.

Hazelnut-chocolate nut butter

After a while, you’ll see the mixture start resembling damp sand. Resist the urge to build sand castles and continue processing. You’ll have to push the crumbs down with a spoon/spatula quite often, because they tend to cling to the wall. There’s no use in having the blades chop thin air.

Hazelnut-chocolate nut butter

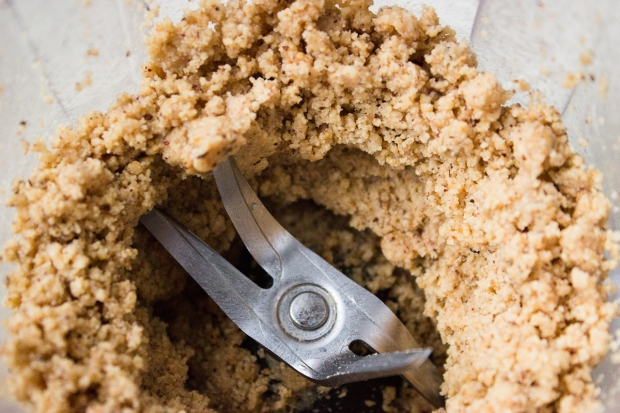
At some point the damp sand turns into this. You’ll see the oils coming out. Not done yet, but you’ve made very good progress!

Hazelnut-chocolate nut butter

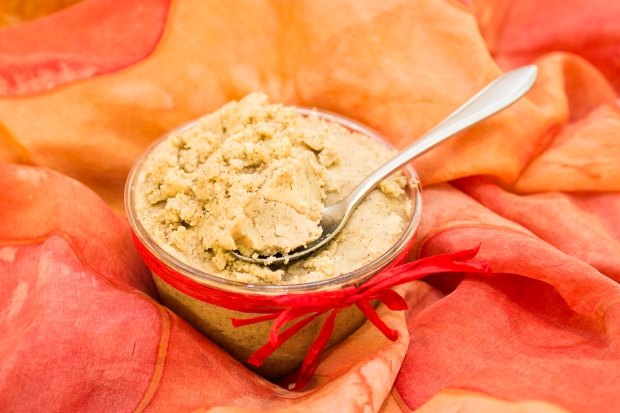
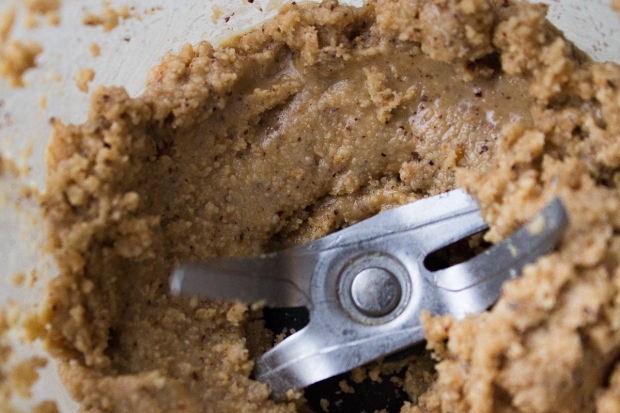
Soon after the previous step you’ll get to this stage. Hazelnuts are done! Enjoy your delightful pure hazelnut butter! But not too much, because otherwise there’ll be nothing left to turn into homemade Nutella.

Hazelnut-chocolate nut butter

Add 1.5 tbsp of cacao powder and 1 tbsp of agave syrup. Feel free to add more of these if you want a more chocolatey or sweet spread. If the mixture is too thick to your liking, add a little bit of water. I added around 2 tbsp of water before getting the consistency I wanted.

Hazelnut-chocolate nut butter

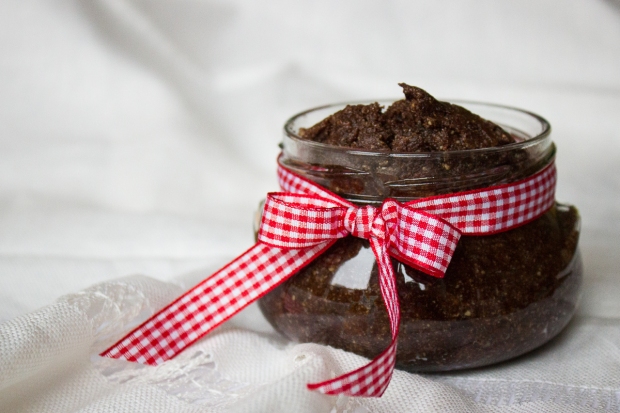
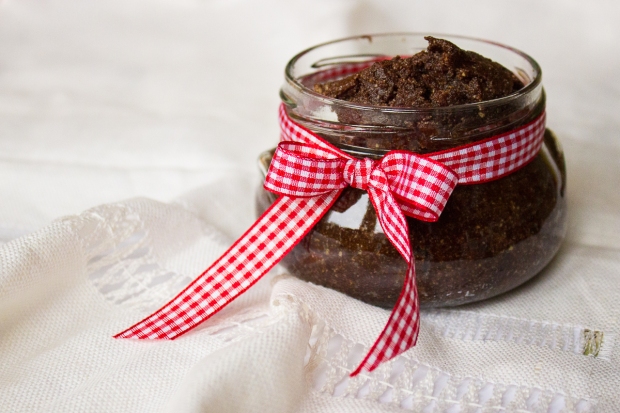
Scoop everything in a jar, lick the spoon clean and you’re done! I put a nice ribbon on the jar since it’s a present. And there you go, a healthy replacement for Nutella! Now I just have to hope my sister’s kids will like it and perhaps ask for a new batch of this instead of the jars of sugar and fat in stores.